Showing posts with label dinner. Show all posts

Thursday, March 5, 2015

I Couldn't Live Without....Pasta! (weekly line-up)

It's been quite a while since I've posted, but I saw this new weekly line-up hosted by a friend of mine at Pursuit of Pink and thought I'd give it a shot!


Every week, at least once, my family has pasta in some way, shape or form. Not only is it sometimes the main feature of a meal, I also use it to reinvent leftovers all the time! Here are a few ideas for pasta that I've made over the past few weeks:


  • Spaghetti w/ Tomato Sauce and Leftover Pot Roast (essentially a ragu)
  • Shrimp Scampi w/ linguini (white wine, lemon, butter, basil, YUM!)
  • Baked Leftover Pasta (add extra cheese and some milk or cream)
  • Mac & Cheese (homemade or boxed) w/ broccoli or butternut squash or spiced up with pickled jalapenos
  • Spaghetti al Melone from Giada De Laurentiis
  • Linguini Shrimp Fra Diavolo w/ Rao's brand Fra Diavolo Sauce
No surprise that my one year old daughter loves pasta. But what IS a surprise is that she'll eat it almost no matter what sauce is on it. The biggest surprise was that she scarfed down the scampi!!!

What are some ways you like to incorporate pasta into your meal?


Monday, August 18, 2014

My Week in Reflection - Aug 10, 2014


As always, I'm excited for this week, but had such an amazing week last week that I wanted to reflect a bit. 


1. Dinner #1: A friend came over for dinner (take-out from our favorite delivery Thai, Chao Phra Ya) and washed her car here, because she lives downtown in DC where washing your own car is kind of a pain. 

2. Dinner #2: Two friends come over and we had "Sunday Gravy" which is the Italian American tradition...usually on Sundays (duh). I made a tomato sauce with italian sausage, meatballs, and some sort of meat with a bone (I used a marrow bone from the farmers market). Then I cooked it ALL DAY in a slow cooker. It was so delicious and had that umami flavor you can only get from cooking something like that with meat for so long. Plus, you throw everything in a pot (more or less) and you just let it cook. Not much work involved.

I served the pasta with the sauce (no meat) first for the Primi Piati (first course). Then the meat separately as a second course (or you are lazy like me and serve it like the picture illustrated below). The sauce freezes beautifully, but I bet if you freeze the meat it would completely fall apart because it's so tender. I vote eat the meat in the next couple days, and freeze the leftover sauce.

Here's a Cook's Illustrated page that explains more along with their picture:

http://recipes.cooksillustrated.com/stews-recipes/italian/pork/hearty-italian-meat-sauce-sunday-gravy-recipe/ 

3. Peach Picking: I went with a friend to Stribling Orchard to pick peaches and a few of their first available apples. So delicious! And my daughter seemed to enjoy it. The drive, not so much (but she's teething...can't really blame her!). 

4. Band Camp: It's that time of year again! I went in on Thursday to Stonewall to teach...not just the guard but the entire band! I taught the guard for about 1.5 hours and then taught the entire band how to jazz run! The whole thing was entertaining because I had my 7 month old daughter with me, and this is the first rehearsal she's been to now that she doesn't sleep 24/7 (I brought her when she was between 1 and 2 months old to teach Stonewall in the winter). I'll start working on a post about how to teach jazz runs to non-dancers!

5. Hershey Park: My dad retired in June and instead of a party, he took the family to Hershey for the weekend!! It was such great fun to stay at a lovely hotel, enjoy the amusement park, hang out at the hotel pool, and eat tons of food and, of course, chocolate. We actually enjoyed the park Friday night AND Saturday because you get to go in Friday night if you're staying at the hotel with a Saturday ticket AND you get to go in 1 hour early Saturday. We also ate delicious BBQ on our way in on Friday at Shakedown BBQ. If you're ever in town, we highly recommend it! And if you see a Reese's Funnel Cake, GET IT! 


Sunday, May 4, 2014

Couponing: Birthday Deals

May is my birth month, which means lots of birthday deals! I wanted to document the one's I'm using in case anyone else is interested! I've hyperlinked where you can sign up for the same deals.

May 1: Enjoyed a free regular bowl at Noodles & Co. and they even threw in a fountain drink! I also learned from a friend that sometimes soda can bother baby's tummy when mom drinks it, which I believe since it was my first soda since our little one was born, and she was screaming in pain from gassiness that night! Whether or not it's medically true, I'm staying a away from soda! Sign up for Noodlegram.

May 3: Used a $10 off coupon at World Market to buy some Torani vanilla syrup for use with our Nespresso. I got two large bottles for about $4 (compared to $16, because I also had 10% off!). Sign up for World Market Explorer.

May 13: Free Starbucks! Granted this was one I earned with 12 stars rather than my birthday drink, so that means I'll get another free drink this month. I didn't need more coffee today, so I bought a venti iced cinnamon dolce latte, took out the ice, and stuck it in the fridge for work tomorrow! Register a Starbucks card.

May 18: My actual birthday! The plan was to have a free medium coffee from Caribou (sign up for Caribou) but after making sure my little one was fed and changed, and okay with daddy, I drove out to the Caribou only to find it closed....and apparently ALL of them in VA are closing! For more information, see here. Quite the disappointing start to my day. So instead, I drove myself over to Starbucks and claimed my birthday drink!

I can still get a free single scoop of Ben & Jerry's ice cream, (sign up to be a ChunkSplunker), a free Benihana a dinner up to $30 (join Chef's Table), and a free burger at Red Robin (join Red Robin Royalty).

Saturday, January 4, 2014

Prepping for Baby's Arrival: Turkey Cutlets

Today I tackled turkey cutlets. We'll eat a couple for dinner and freeze the rest. They make great turkey parmigiana, could be splashed with fresh squeezed lemon, or put onto a sandwich.

For this recipe, there aren't really amounts because it just depends how well you coat the cutlets, and how many cutlets you have.

Ingredients:

  • Thin sliced turkey cutlets (or pound flat some turkey or chicken)
  • Flour
  • Eggs (about 2 per lb of meat)
  • Panko breadcrumbs
  • Progresso Italian Style breadcrumbs
  • Grated Parmesan (or the real stuff, parmigiano reggiano)
  • Salt & pepper
  • Garlic powder
  • Oil for pan frying


Directions:

  1. In bowl #1, put flour and season with salt, pepper, and garlic powder. In bowl #2, put the two eggs with a bit of salt. In bowl #3, put your two kinds of breadcrumbs, cheese, and season with salt, pepper and garlic if your breadcrumbs need extra seasoning.
  2. Set up a drying rack with a sheet pan and a cooling rack on top (instead of a sheet pan, I used a silpad, or you could use paper towel).
  3. Place each cutlet, one at a time, in the flour and flip over to fully coat. Place each cutlet onto the drying rack. I do this step first with ALL the cutlets so that the flour can have a second to absorb any moisture.
  4. Before the next step of the breading, pour some oil (use Canola or Olive Oil) into a large flat bottomed saute pan. The larger the pan, the more you can cook at once. Heat over medium heat.
  5. After you finish with the flour coating, go back to your first cutlet and one at a time, dip them into egg, let the egg drain off a bit, and then dip into the breadcrumb mixture, and then place onto the drying rack. Go through each cutlet until you've finished all of them.
  6. Test your oil to make sure it's hot enough with a tiny drop of water. If it sizzles, it's ready!
  7. Carefully place about 3 pieces into the oil. Do not crowd the pan. Cook until the first side is browned. I personally like them pretty browned but some people like them a little lighter, so that's up to you. Timing completely depends on the heat of the oil, the thickness of your meat, and how browned you like them, so you'll just have to watch.
  8. Flip the cutlet over (carefully!) using tongs. Finish cooking on the second side. Once cooked to your liking, place the cooked cutlet either on a plate/pan covered in paper towels or onto cooling rack.
  9. Repeat until you're done with all the cutlets.

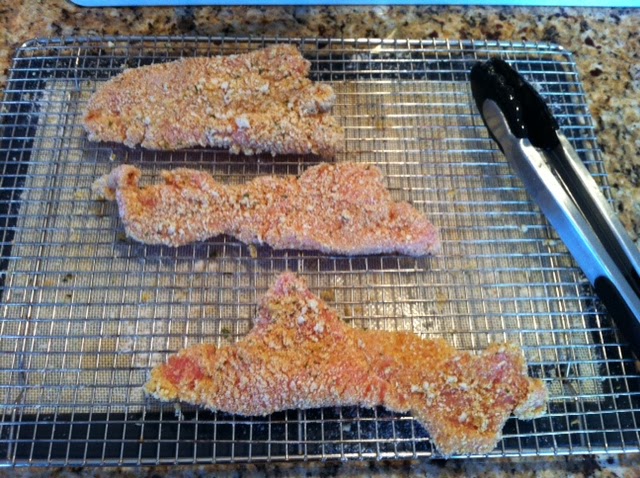
Here's a what the cutlets should look like after being fully breaded and ready to cook, atop a drying rack.


Below is a picture after I flipped the cutlets over to show you how brown they should look. YOu should constantly see little bubbles around the cutlet or your oil isn't hot enough. I keep a cover nearby just in case the oil starts to splatter too much, or (god forbid!) a fire occurs. If one does occur, cover the pan completely and turn off your stove immediately.


And below is the final product, cooling off. This lets the cutlet drain off any excess oil, while keeping the Panko crispy. A paper towel will work if you don't have a cooling rack, but it may steam the underneath and make them less crispy.


Another trick if you have kids or need to stretch the meal a bit. You can also bread and fry up slices of bread! I wouldn't use the first coating of flour, just the egg and then the breadcrumbs. They end up tasting like amazingly delicious breadsticks. My brother's and I used to fight over the fried bread!!

And with that, I'm up to at least 3 weeks of meals prepped for when baby arrives!

Thursday, January 2, 2014

Prepping for Baby's Arrival: Easy Meals

I've been known to cook a lot, and I always freeze the extra that I make. That has been in overdrive in the last month or so prepping for the arrival of baby. So that, combined with some shelf stable meals has us covered for multiple nights after baby arrives. Some of the frozen meals took a while too cook, but I just set aside I day I knew I'd be home and had it sit on the stove all day while I went about my cleaning or lounging.

My homemade frozen, ready to cook meals include:
  • Chili
  • Turkey Bolognese (admittedly, this one takes the longest, about 4 hours, but it's soooooo good)
  • Tomato Sauce
  • Ham & Bean Soup
  • Turkey Pot Pie (just the filling, the topping can be added when you cook)
  • Turkey Soup
  • Chicken Soup
  • Chicken Fajitas (I left the chicken raw and didn't put any veggies in the bag, just chicken & marinade)
  • Lasagna
  • Portuguese Kale Soup
My freezer trick is that I cool everything, and then load it into gallon size freezer bags. Label them before you fill them! I also stand them up in a big bowl and turn the top over so it doesn't get messy. I try to judge how much 2 people will eat and only pack that much in the bag. I then freeze it flat. That way they stack really easily in the freezer and don't waste much space. To reheat, let them thaw a bit first, then you can break it up and put it in a pan to heat.

I've borrowed a picture from Jamie Cooks It Up to show the freezer bag technique below. Note this is a smaller bag in a cup, and I use gallon bags in a big bowl.


I also have some easy shelf stable (or mostly shelf stable) meals:

That should be at least 20 dinners (some of them are doubled) and I plan to make some turkey cutlets tomorrow to freeze. I'll bread them, fry them, and then freeze them individually. They can be eaten splashed with lemon, or covered in sauce and mozzarella cheese. They're also great as a sandwich! That'll put me over 3 full weeks of dinners!

I've linked to Jamie Cooks It Up, Meal Survivor, Annie's, Amy's and Campbell's.

What's your favorite go-to meal?

Friday, November 15, 2013

Crockpot Dinner: Sweet and Sour Chicken

Tonight we have a bit of an Asian theme going on for dinner. I decided to try making Clinton Kelly's version of sweet and sour chicken in the crockpot, but I had to make some adjustments to the recipe. Most importantly, I thought I had orange marmalade....turns out I had apricot (it was in German and I didn't know any better). So I put in some of that, and added in a clementine plus it's peel to help up the orange flavor. I also didn't brown the chicken, which will make a difference, but being 31 weeks pregnant, it just wasn't a top priority for me today.

Here's the recipe I ended up actually making. I had to use the picture from The Chew's website, because we ate most of it! Ours didn't end up as caramelized, but it was still delicious!

Sweet Sour Chicken Clinton Kelly

Ingredients:
  • 1 package of chicken thighs
  • Salt
  • freshly cracked Black Pepper
  • About 6 oz Apricot Jam
  • 1 clementine (peel plus the juice - could have used more but that's all I had)
  • 3 tablespoons Soy Sauce
  • 3 tablespoons BBQ Sauce
  • 3 tablespoons Rice Vinegar
  • 2 teaspoons Red Chile Flakes
  • 1 inch Fresh Ginger (peeled and sliced into coins)
  • 2 carrots, in large chunks
  • 1/2 package of mushrooms, halved
  • 1-2 scallions (sliced on bias)
Directions:
  1. Place the chicken in the bottom of the crockpot, and add salt and pepper
  2. Mix together the jam, soy sauce, BBQ sauce, rice vinegar, chili flakes, ginger, and the clementine juice and peel
  3. Pour the mixture over the chicken
  4. Cook on low 2-3 hours or high 5-6 hours
  5. About 1/2 hour before the end of cooking, add in the mushrooms and carrots
  6. After it's cooked, serve over rice with the scallions
I also served it with Szechuan green beans with oil, garlic, ginger, crushed red pepper, a bit of soy sauce, a bit of rice vinegar, and some salt.

What's your favorite slow cooker recipe?

Tuesday, November 12, 2013

Standby Recipes: Ham & Bean Soup

Anytime there's an event with a ham involved, there will certainly be ham and bean soup to follow. And when I make it, I use my MASSIVE 20 qt. pot, so there is plenty to freeze. This time around, I'm making it to prep for Baby Chickpea's arrival in January and bringing some to a friend who just had a baby last week.


(Don't let the picture fool you. This is about 20 servings of soup!)


Ingredients:
  • Mixed beans, soaked overnight (at least 1 lb but I tend to add more)
  • 1 ham bone
  • 1-2 onions, diced
  • 4 cloves of garlic, chopped
  • 5 carrots, diced
  • 5 ribs of celery, diced
  • Ham (however much you want to add), cubed
  • Water (enough to cover everything)
  • Seasonings (e.g., salt, pepper, thyme, oregano, paprika)
  • Optional: 1 teas. liquid smoke
  • Leftover juices from making the ham (not necessary but add a lot of flavor and gelatin from the original cooking)

Directions:
  • Heat a bit of oil in the bottom of the pot and add your onions, celery and carrots, seasoning with salt and pepper. Once translucent, add garlic and cook for 1-2 minutes.
  • Add to the pot your ham, beans and water and the seasonings of your choice. If you have the leftover juices from cooking the ham, add them now, too.
  • Cook until it looks and tastes done. I usually cook for at least a couple hours to get the beans to become a bit mushy which makes the soup thicker.
  • Cool on the stove and then the fridge.
  • Pack into 1 gallon freezer bags, and freeze flat in your freezer (they store easiest this way)
I usually keep one meal's worth unfrozen to eat that night, and freeze the rest. Then when we want ham and bean soup you can either thaw an entire bag at a time, or if it's just you one night, you can sit it on the counter for a short bit and break off a corner of the frozen flat-pack. Then microwave or heat on the stove the portion for just you!

Updates:
  • Keep in mind the soup will be different depending on how you roasted your ham in the first place. This one was really sweet and had mustard so the soup turned out sweet and had some mustard in the seasonings. Sometimes if the ham isn't as sweet to begin with, I'll add a bit of maple syrup or brown sugar (think about maple glazed or brown sugar glazed ham...same flavor idea).
  • If you can avoid it, do not use the little packet that comes in the bean mix. It has a lot of chemicals and artificial flavors. If you use the ingredients I mentioned above, it should work out just fine without that packet!

Thursday, November 7, 2013

Autumn Thursday: "Fondue" Mac & Cheese

Today, in trying to figure out what to make for lunch, I thought of my old standby, Mac & Cheese with the addition of a lot of broccoli. I figured I'd make homemade (simple white sauce with shredded cheddar), but then I got to thinking. In my Halloween post, I reinvented grilled cheese with traditional fondue flavors - garlic, gruyere, nutmeg, and apple. Why not reinvent Mac & Cheese in a fondue style!


Ingredients:
  • 1/4 lb short pasta
  • 1 Tbs butter or oil
  • 1 clove garlic, grated or pressed
  • 1 teas flour
  • 1 Tbs white wine
  • 1/4 cup milk
  • 1 cup shredded swiss cheese
  • Dash nutmeg
  • Dash garlic powder
  • Dash powdered mustard
  • Salt/pepper to taste
  • 1 cup (or so) broccoli
  • 1/2 cup peas
  • 1 crisp apple, cubed

Directions:
  1. Boil pasta according to directions. Save 1/4 cup of pasta water, then drain pasta and set aside.
  2. In the pan, heat your butter and/or oil. Add the garlic once butter is melted. Then add the flour and stir until thoroughly combined.
  3. Add the wine until it's bubbled off the alcohol.
  4. Add in the milk a bit at a time, constantly stirring. You may need a bit more than 1/4 cup.
  5. Incorporate the cheese. Add gruyere or gouda too if you have some for more nutty flavor, but regular swiss will melt best.
  6. Add in the seasonings to taste.
  7. Mix in the veggies and pasta, and lastly the apple.
  8. If it needs more liquid, use the reserved pasta water.
Enjoy!

And please leave comments if you have any questions or thoughts! I'd love to hear what you think about this idea.

Tuesday, October 8, 2013

Reinvention Recipe: BBQ Chicken

Over the weekend we had a lot of friends over and got DELICIOUS catering from Willard's BBQ. Somehow, even though I underestimated, we ended up with leftovers galore. I froze a small amount of beef brisket and pulled pork for once baby Chickpea arrives, and we had my in-law's for lunch Sunday, but there is still so much chicken I had to get a little creative.

Today at work I asked my colleagues what to do with the leftover BBQ chicken. Luckily it has BBQ dry rub seasonings but no sauce. One colleague mentioned enchiladas, so that's what we're doing! Except I'm going with crunchy taco shells because they sounded yummy.

Here's a picture of the ingredients:


Pictured above:
  • Leftover BBQ Chicken (will get shredded)
  • Enchilada sauce
  • Taco Shells
  • Lettuce
  • Plain yogurt (instead of sour cream)
  • Cilantro
  • Refried beans
  • Other options: salsa, tomatoes, shredded cheese
All I did was heat the shredded chicken in a skillet with some enchilada sauce and heat up the beans and taco shells. Voila...dinner!