Showing posts with label freezer. Show all posts

Tuesday, May 27, 2014

Mom Posts: My Favorite Products

I noticed recently that I've been sharing some of my favorite products with my friends who have recently had kids or are expecting. I figure, if I'm sharing offline, why not online, too! These aren't in any particular order, and I do highlight some products at the bottom that I was not really a fan of.

My Top Picks

  First Years Breast Milk Storage   
http://www.amazon.com/The-First-Years-Breastflow-Organizer/dp/B000K4YSVI/ref=sr_1_1?ie=UTF8&qid=1401211791&sr=8-1&keywords=first+years+milk+storage
First Years Breast Milk Storage on Amazon

This product was purchased after a bit of research (though not much) and only a small grasp on the need to freeze and store milk. I have to say this is one of my favorite baby-related purchases to-date! It was quite the unexpected surprise. It's been perfect to freeze/store milk because it has a compression piece on one end that flattens the milk so you can store it more easily, and because it's frozen thinly, it also thaws quicker!

  Lansinoh Storage Bags  

Lansinoh Storage Bags on Amazon

While I did research these enough to know that they didn't work with my pump (Ameda Purely Yours) but that they were the right width for the First Years container, and got pretty good reviews, I didn't realize how much I loved them until I tried using the bags that DO go with my pump.

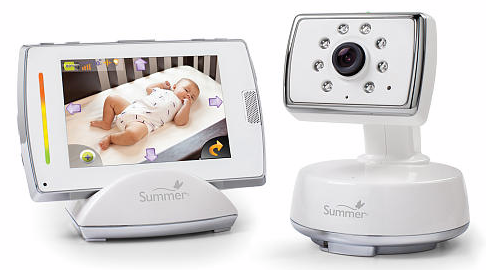
  Summer Infant Video Monitor          
Summer Infant Video Monitor on Babies 'R Us Website 
(Note that the product we bought is no longer listed at Babies 'r Us, but I believe this is the newer version)

My husband got to pick this product out because he loves electronics! Since we were getting a video monitor, I wanted one that would work with our iPhones for whenever we're away and she's with a babysitter, or if one of us is traveling and we just want to catch a peek at our daughter. I had to travel 2 weeks after going back to work and was able to use it from TX!! For us, this was worth the money. That said, we did get a registry completion discount, and it was on sale, so it made it even more affordable (still not truly "affordable" though).

  Baby Jogger City Mini GT   
Baby Jogger City Mini GT on Amazon

While this stroller is not small, it's one of the smaller jogging strollers I've seen. You can fold it with one hand (there's a pull handle in the middle of the seat to fold it) and it folds pretty flat. It has an adapter for our Peg Perego infant seat and it snaps in and also has a buckle that goes across to ensure it's safe. I use it with a stroller attachment that goes on the handle and also bought the toddler "tray" for later use!

  ErgoBaby Organic Baby Carrier and Infant Insert   
ErgoBaby Organic Baby Carrier on Amazon
Infant Insert on Amazon


This is one of the few carriers that can be used with a newborn and it was perfect! Keep in mind, I had the baby in the middle of the Mid Atlantic Polar Vortex, and I am pretty sure if you have a baby in August, not only will the baby get too hot in this, but so will you. Just something to keep in mind! Now that she's over 12 lbs, we took out the infant insert and this carrier is quite comfortable for mom. I can put it on by myself, as long as she isn't wiggling too much.

  Fisher Price Rock 'n Play   
Fisher Price Rock 'n Play on Amazon

 This rocker was a Godsend in the first couple weeks at home. We tried desperately to get her to sleep in her bassinet, which someone very graciously gave to us (hand-me-down). She hated being on her back even if we swaddled her tight! Those first couple nights I didn't know what to do and just held her so she could sleep. After 2 nights of holding her (and not really sleeping myself!) I tried the Rock 'n Play. Now, doctors advice is to only allow babies to sleep on their back, so do not take my recommendation without making a conscious decision yourself and checking with your own doctor, but it was the ONLY thing that she would sleep in! She slept in it at night and for all naps! Now, at 4 months, she uses it occasionally for a nap or two, but is in her own crib 95% of the time.

  JJ Cole Diaper Changing Clutch  

JJ Cole Diaper Changing Clutch on Amazon

Big diaper bags are great, but when you are sitting with a friend for coffee or lunch, and you need to go change the baby in a very small restroom (or you're lazy and don't want to carry a big bag with you), this clutch is very handy. It is fairly large, has a pocket for diapers and a place to insert a package of wipes. I also put a ziplock bag with a couple newspaper bags for dirty diapers. That way I just grab this and go, without having to fiddle with a big bag. So much easier! It's also great that it matches my diaper bag!

The Items I Wasn't As Thrilled About

  My Brest Friend  
My Brest Friend on Amazon

Some people love this thing and they even had them in the hospital where I delivered, so use your own judgment. For me, this pillow is too cumbersome because it has a piece that goes around the back. I couldn't use it at first because my belly was still too big (uterus hadn't contracted yet) and now I just don't like using it because of the strap around the back. I love that it's a bit more sturdy than the Boppy, but I choose the Bobby over this product (which is unfortunate because the My Brest Friend was a very thoughtful gift from someone!).

  Ameda Store 'n Pour Milk Storage Bags  
Ameda Store 'n Pour Milk Storage Bags on Amazon

They're hard to open and feel a bit flimsy in my mind. They're a bit too wide for the storage container I'm using (but I make it work!). I also decided against using them with my pump because I'm always afraid I'm going to spill the milk if I lean forward even slightly.

Saturday, January 4, 2014

Prepping for Baby's Arrival: Turkey Cutlets

Today I tackled turkey cutlets. We'll eat a couple for dinner and freeze the rest. They make great turkey parmigiana, could be splashed with fresh squeezed lemon, or put onto a sandwich.

For this recipe, there aren't really amounts because it just depends how well you coat the cutlets, and how many cutlets you have.

Ingredients:

  • Thin sliced turkey cutlets (or pound flat some turkey or chicken)
  • Flour
  • Eggs (about 2 per lb of meat)
  • Panko breadcrumbs
  • Progresso Italian Style breadcrumbs
  • Grated Parmesan (or the real stuff, parmigiano reggiano)
  • Salt & pepper
  • Garlic powder
  • Oil for pan frying


Directions:

  1. In bowl #1, put flour and season with salt, pepper, and garlic powder. In bowl #2, put the two eggs with a bit of salt. In bowl #3, put your two kinds of breadcrumbs, cheese, and season with salt, pepper and garlic if your breadcrumbs need extra seasoning.
  2. Set up a drying rack with a sheet pan and a cooling rack on top (instead of a sheet pan, I used a silpad, or you could use paper towel).
  3. Place each cutlet, one at a time, in the flour and flip over to fully coat. Place each cutlet onto the drying rack. I do this step first with ALL the cutlets so that the flour can have a second to absorb any moisture.
  4. Before the next step of the breading, pour some oil (use Canola or Olive Oil) into a large flat bottomed saute pan. The larger the pan, the more you can cook at once. Heat over medium heat.
  5. After you finish with the flour coating, go back to your first cutlet and one at a time, dip them into egg, let the egg drain off a bit, and then dip into the breadcrumb mixture, and then place onto the drying rack. Go through each cutlet until you've finished all of them.
  6. Test your oil to make sure it's hot enough with a tiny drop of water. If it sizzles, it's ready!
  7. Carefully place about 3 pieces into the oil. Do not crowd the pan. Cook until the first side is browned. I personally like them pretty browned but some people like them a little lighter, so that's up to you. Timing completely depends on the heat of the oil, the thickness of your meat, and how browned you like them, so you'll just have to watch.
  8. Flip the cutlet over (carefully!) using tongs. Finish cooking on the second side. Once cooked to your liking, place the cooked cutlet either on a plate/pan covered in paper towels or onto cooling rack.
  9. Repeat until you're done with all the cutlets.

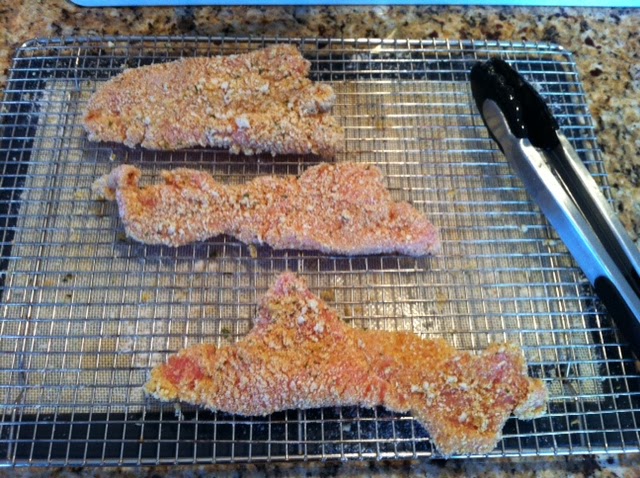
Here's a what the cutlets should look like after being fully breaded and ready to cook, atop a drying rack.


Below is a picture after I flipped the cutlets over to show you how brown they should look. YOu should constantly see little bubbles around the cutlet or your oil isn't hot enough. I keep a cover nearby just in case the oil starts to splatter too much, or (god forbid!) a fire occurs. If one does occur, cover the pan completely and turn off your stove immediately.


And below is the final product, cooling off. This lets the cutlet drain off any excess oil, while keeping the Panko crispy. A paper towel will work if you don't have a cooling rack, but it may steam the underneath and make them less crispy.


Another trick if you have kids or need to stretch the meal a bit. You can also bread and fry up slices of bread! I wouldn't use the first coating of flour, just the egg and then the breadcrumbs. They end up tasting like amazingly delicious breadsticks. My brother's and I used to fight over the fried bread!!

And with that, I'm up to at least 3 weeks of meals prepped for when baby arrives!

Thursday, January 2, 2014

Prepping for Baby's Arrival: Easy Meals

I've been known to cook a lot, and I always freeze the extra that I make. That has been in overdrive in the last month or so prepping for the arrival of baby. So that, combined with some shelf stable meals has us covered for multiple nights after baby arrives. Some of the frozen meals took a while too cook, but I just set aside I day I knew I'd be home and had it sit on the stove all day while I went about my cleaning or lounging.

My homemade frozen, ready to cook meals include:
  • Chili
  • Turkey Bolognese (admittedly, this one takes the longest, about 4 hours, but it's soooooo good)
  • Tomato Sauce
  • Ham & Bean Soup
  • Turkey Pot Pie (just the filling, the topping can be added when you cook)
  • Turkey Soup
  • Chicken Soup
  • Chicken Fajitas (I left the chicken raw and didn't put any veggies in the bag, just chicken & marinade)
  • Lasagna
  • Portuguese Kale Soup
My freezer trick is that I cool everything, and then load it into gallon size freezer bags. Label them before you fill them! I also stand them up in a big bowl and turn the top over so it doesn't get messy. I try to judge how much 2 people will eat and only pack that much in the bag. I then freeze it flat. That way they stack really easily in the freezer and don't waste much space. To reheat, let them thaw a bit first, then you can break it up and put it in a pan to heat.

I've borrowed a picture from Jamie Cooks It Up to show the freezer bag technique below. Note this is a smaller bag in a cup, and I use gallon bags in a big bowl.


I also have some easy shelf stable (or mostly shelf stable) meals:

That should be at least 20 dinners (some of them are doubled) and I plan to make some turkey cutlets tomorrow to freeze. I'll bread them, fry them, and then freeze them individually. They can be eaten splashed with lemon, or covered in sauce and mozzarella cheese. They're also great as a sandwich! That'll put me over 3 full weeks of dinners!

I've linked to Jamie Cooks It Up, Meal Survivor, Annie's, Amy's and Campbell's.

What's your favorite go-to meal?

Tuesday, November 12, 2013

Standby Recipes: Ham & Bean Soup

Anytime there's an event with a ham involved, there will certainly be ham and bean soup to follow. And when I make it, I use my MASSIVE 20 qt. pot, so there is plenty to freeze. This time around, I'm making it to prep for Baby Chickpea's arrival in January and bringing some to a friend who just had a baby last week.


(Don't let the picture fool you. This is about 20 servings of soup!)


Ingredients:
  • Mixed beans, soaked overnight (at least 1 lb but I tend to add more)
  • 1 ham bone
  • 1-2 onions, diced
  • 4 cloves of garlic, chopped
  • 5 carrots, diced
  • 5 ribs of celery, diced
  • Ham (however much you want to add), cubed
  • Water (enough to cover everything)
  • Seasonings (e.g., salt, pepper, thyme, oregano, paprika)
  • Optional: 1 teas. liquid smoke
  • Leftover juices from making the ham (not necessary but add a lot of flavor and gelatin from the original cooking)

Directions:
  • Heat a bit of oil in the bottom of the pot and add your onions, celery and carrots, seasoning with salt and pepper. Once translucent, add garlic and cook for 1-2 minutes.
  • Add to the pot your ham, beans and water and the seasonings of your choice. If you have the leftover juices from cooking the ham, add them now, too.
  • Cook until it looks and tastes done. I usually cook for at least a couple hours to get the beans to become a bit mushy which makes the soup thicker.
  • Cool on the stove and then the fridge.
  • Pack into 1 gallon freezer bags, and freeze flat in your freezer (they store easiest this way)
I usually keep one meal's worth unfrozen to eat that night, and freeze the rest. Then when we want ham and bean soup you can either thaw an entire bag at a time, or if it's just you one night, you can sit it on the counter for a short bit and break off a corner of the frozen flat-pack. Then microwave or heat on the stove the portion for just you!

Updates:
  • Keep in mind the soup will be different depending on how you roasted your ham in the first place. This one was really sweet and had mustard so the soup turned out sweet and had some mustard in the seasonings. Sometimes if the ham isn't as sweet to begin with, I'll add a bit of maple syrup or brown sugar (think about maple glazed or brown sugar glazed ham...same flavor idea).
  • If you can avoid it, do not use the little packet that comes in the bean mix. It has a lot of chemicals and artificial flavors. If you use the ingredients I mentioned above, it should work out just fine without that packet!