Showing posts with label easy meals. Show all posts

Sunday, June 8, 2014

Recipe Reinvention: "Leftover" Pasta, Carbonara Style

This past week we had some leftovers, and when I say some, I mean VERY LITTLE, but I was determined to make lunch for my husband and me out of it on Friday. I realized we had eggs, grated cheese, and bacon grease, and I could make a carbonara-like meal!

Here's what we had:

Leftover Ingredients:
  • 1 chicken thigh, cooked and diced
  • about 10 cubes of roasted potatoes
  • 1 serving of rotini pasta, cooked
New Ingredients:
  • Olive oil
  • 1 Tbs Bacon grease (technically I guess it's a leftover....)
  • 1/2 onion, sliced
  • 1 garlic clove, minced
  • 1 carrot, cut up (I julienned it)
  • 1 rib of celery, diced
  • 1/2 cup wine
  • 2 eggs, beaten
  • A bit of parsley, chopped
  • A few leaves of basil, chopped
  • Salt to taste
  • Grated cheese to taste
Directions:
  1. In a saute pan, heat up the olive oil and bacon grease. Add onions, carrots and celery and a bit of salt. Once softened a bit, add the garlic and stir for 1-2 minutes to cook the garlic without burning.
  2. Add in the wine and let it sizzle. Once the wine is warm, push the veggies to one side and whisk the egg into the liquid. Pour slowly. Whisk quickly!
  3. Add in the pasta, chicken and potato cubes and stir till warmed through. Throw in the basil and parsley.
  4. Take off the stove and add the cheese.
Voila!!! "Leftover" Pasta Carbonara.

Saturday, January 4, 2014

Prepping for Baby's Arrival: Turkey Cutlets

Today I tackled turkey cutlets. We'll eat a couple for dinner and freeze the rest. They make great turkey parmigiana, could be splashed with fresh squeezed lemon, or put onto a sandwich.

For this recipe, there aren't really amounts because it just depends how well you coat the cutlets, and how many cutlets you have.

Ingredients:

  • Thin sliced turkey cutlets (or pound flat some turkey or chicken)
  • Flour
  • Eggs (about 2 per lb of meat)
  • Panko breadcrumbs
  • Progresso Italian Style breadcrumbs
  • Grated Parmesan (or the real stuff, parmigiano reggiano)
  • Salt & pepper
  • Garlic powder
  • Oil for pan frying


Directions:

  1. In bowl #1, put flour and season with salt, pepper, and garlic powder. In bowl #2, put the two eggs with a bit of salt. In bowl #3, put your two kinds of breadcrumbs, cheese, and season with salt, pepper and garlic if your breadcrumbs need extra seasoning.
  2. Set up a drying rack with a sheet pan and a cooling rack on top (instead of a sheet pan, I used a silpad, or you could use paper towel).
  3. Place each cutlet, one at a time, in the flour and flip over to fully coat. Place each cutlet onto the drying rack. I do this step first with ALL the cutlets so that the flour can have a second to absorb any moisture.
  4. Before the next step of the breading, pour some oil (use Canola or Olive Oil) into a large flat bottomed saute pan. The larger the pan, the more you can cook at once. Heat over medium heat.
  5. After you finish with the flour coating, go back to your first cutlet and one at a time, dip them into egg, let the egg drain off a bit, and then dip into the breadcrumb mixture, and then place onto the drying rack. Go through each cutlet until you've finished all of them.
  6. Test your oil to make sure it's hot enough with a tiny drop of water. If it sizzles, it's ready!
  7. Carefully place about 3 pieces into the oil. Do not crowd the pan. Cook until the first side is browned. I personally like them pretty browned but some people like them a little lighter, so that's up to you. Timing completely depends on the heat of the oil, the thickness of your meat, and how browned you like them, so you'll just have to watch.
  8. Flip the cutlet over (carefully!) using tongs. Finish cooking on the second side. Once cooked to your liking, place the cooked cutlet either on a plate/pan covered in paper towels or onto cooling rack.
  9. Repeat until you're done with all the cutlets.

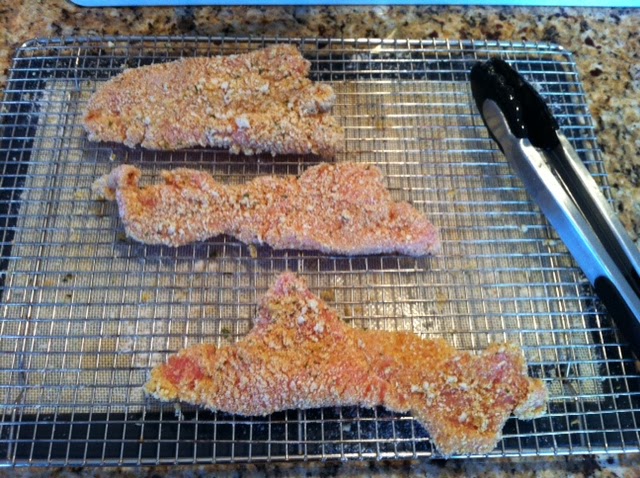
Here's a what the cutlets should look like after being fully breaded and ready to cook, atop a drying rack.


Below is a picture after I flipped the cutlets over to show you how brown they should look. YOu should constantly see little bubbles around the cutlet or your oil isn't hot enough. I keep a cover nearby just in case the oil starts to splatter too much, or (god forbid!) a fire occurs. If one does occur, cover the pan completely and turn off your stove immediately.


And below is the final product, cooling off. This lets the cutlet drain off any excess oil, while keeping the Panko crispy. A paper towel will work if you don't have a cooling rack, but it may steam the underneath and make them less crispy.


Another trick if you have kids or need to stretch the meal a bit. You can also bread and fry up slices of bread! I wouldn't use the first coating of flour, just the egg and then the breadcrumbs. They end up tasting like amazingly delicious breadsticks. My brother's and I used to fight over the fried bread!!

And with that, I'm up to at least 3 weeks of meals prepped for when baby arrives!

Thursday, January 2, 2014

Prepping for Baby's Arrival: Easy Meals

I've been known to cook a lot, and I always freeze the extra that I make. That has been in overdrive in the last month or so prepping for the arrival of baby. So that, combined with some shelf stable meals has us covered for multiple nights after baby arrives. Some of the frozen meals took a while too cook, but I just set aside I day I knew I'd be home and had it sit on the stove all day while I went about my cleaning or lounging.

My homemade frozen, ready to cook meals include:
  • Chili
  • Turkey Bolognese (admittedly, this one takes the longest, about 4 hours, but it's soooooo good)
  • Tomato Sauce
  • Ham & Bean Soup
  • Turkey Pot Pie (just the filling, the topping can be added when you cook)
  • Turkey Soup
  • Chicken Soup
  • Chicken Fajitas (I left the chicken raw and didn't put any veggies in the bag, just chicken & marinade)
  • Lasagna
  • Portuguese Kale Soup
My freezer trick is that I cool everything, and then load it into gallon size freezer bags. Label them before you fill them! I also stand them up in a big bowl and turn the top over so it doesn't get messy. I try to judge how much 2 people will eat and only pack that much in the bag. I then freeze it flat. That way they stack really easily in the freezer and don't waste much space. To reheat, let them thaw a bit first, then you can break it up and put it in a pan to heat.

I've borrowed a picture from Jamie Cooks It Up to show the freezer bag technique below. Note this is a smaller bag in a cup, and I use gallon bags in a big bowl.


I also have some easy shelf stable (or mostly shelf stable) meals:

That should be at least 20 dinners (some of them are doubled) and I plan to make some turkey cutlets tomorrow to freeze. I'll bread them, fry them, and then freeze them individually. They can be eaten splashed with lemon, or covered in sauce and mozzarella cheese. They're also great as a sandwich! That'll put me over 3 full weeks of dinners!

I've linked to Jamie Cooks It Up, Meal Survivor, Annie's, Amy's and Campbell's.

What's your favorite go-to meal?