Saturday, January 4, 2014

Prepping for Baby's Arrival: Turkey Cutlets

Today I tackled turkey cutlets. We'll eat a couple for dinner and freeze the rest. They make great turkey parmigiana, could be splashed with fresh squeezed lemon, or put onto a sandwich.

For this recipe, there aren't really amounts because it just depends how well you coat the cutlets, and how many cutlets you have.

Ingredients:

  • Thin sliced turkey cutlets (or pound flat some turkey or chicken)
  • Flour
  • Eggs (about 2 per lb of meat)
  • Panko breadcrumbs
  • Progresso Italian Style breadcrumbs
  • Grated Parmesan (or the real stuff, parmigiano reggiano)
  • Salt & pepper
  • Garlic powder
  • Oil for pan frying


Directions:

  1. In bowl #1, put flour and season with salt, pepper, and garlic powder. In bowl #2, put the two eggs with a bit of salt. In bowl #3, put your two kinds of breadcrumbs, cheese, and season with salt, pepper and garlic if your breadcrumbs need extra seasoning.
  2. Set up a drying rack with a sheet pan and a cooling rack on top (instead of a sheet pan, I used a silpad, or you could use paper towel).
  3. Place each cutlet, one at a time, in the flour and flip over to fully coat. Place each cutlet onto the drying rack. I do this step first with ALL the cutlets so that the flour can have a second to absorb any moisture.
  4. Before the next step of the breading, pour some oil (use Canola or Olive Oil) into a large flat bottomed saute pan. The larger the pan, the more you can cook at once. Heat over medium heat.
  5. After you finish with the flour coating, go back to your first cutlet and one at a time, dip them into egg, let the egg drain off a bit, and then dip into the breadcrumb mixture, and then place onto the drying rack. Go through each cutlet until you've finished all of them.
  6. Test your oil to make sure it's hot enough with a tiny drop of water. If it sizzles, it's ready!
  7. Carefully place about 3 pieces into the oil. Do not crowd the pan. Cook until the first side is browned. I personally like them pretty browned but some people like them a little lighter, so that's up to you. Timing completely depends on the heat of the oil, the thickness of your meat, and how browned you like them, so you'll just have to watch.
  8. Flip the cutlet over (carefully!) using tongs. Finish cooking on the second side. Once cooked to your liking, place the cooked cutlet either on a plate/pan covered in paper towels or onto cooling rack.
  9. Repeat until you're done with all the cutlets.

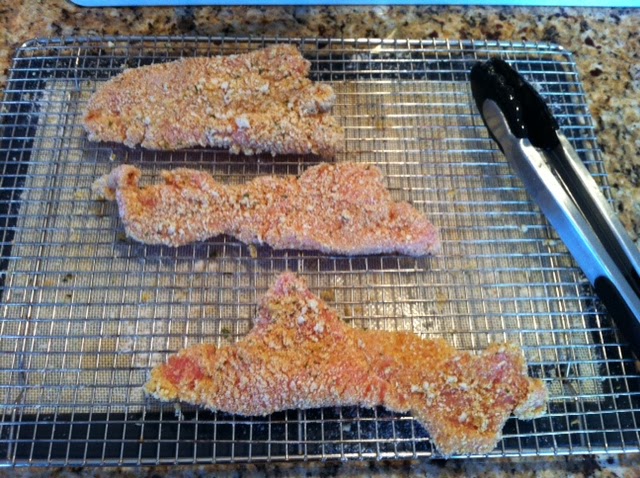
Here's a what the cutlets should look like after being fully breaded and ready to cook, atop a drying rack.

Below is a picture after I flipped the cutlets over to show you how brown they should look. YOu should constantly see little bubbles around the cutlet or your oil isn't hot enough. I keep a cover nearby just in case the oil starts to splatter too much, or (god forbid!) a fire occurs. If one does occur, cover the pan completely and turn off your stove immediately.


And below is the final product, cooling off. This lets the cutlet drain off any excess oil, while keeping the Panko crispy. A paper towel will work if you don't have a cooling rack, but it may steam the underneath and make them less crispy.


Another trick if you have kids or need to stretch the meal a bit. You can also bread and fry up slices of bread! I wouldn't use the first coating of flour, just the egg and then the breadcrumbs. They end up tasting like amazingly delicious breadsticks. My brother's and I used to fight over the fried bread!!

And with that, I'm up to at least 3 weeks of meals prepped for when baby arrives!

Friday, January 3, 2014

Prepping for Baby's Arrival: A Network of Support

We have had incredibly generous friends and family who have all given us hand-me-downs for Baby Chickpea! It got me thinking about how something about motherhood creates a network of support that doesn't exist in other ways.

It started when I became pregnant. I had family, friends and even one acquaintance from a certification course, who had recently had babies and wanted to lend or give me maternity clothes! I was shocked that so many people recognize that maternity clothes are only used for a short period of time, and some things you don't use the same season of maternity clothes. My sister-in-law let me borrow a few sweaters and a pair of jeans. A friend and coworker gave me two business casual dresses, a fancy dress that I used for the holiday parties I had to attend, a maternity coat, and a few other odds and ends. The biggest shock, however, was that a classmate from a certification course, as soon as I told her I was pregnant, she got excited and then said "I have tubs of maternity clothes I want to get rid of!" I barely new her, and here she was giving me two large tubs of clothes! Granted, not everything fit well, but those two tubs meant I only bought a couple shirts, a pair of dress black pants, and a couple pairs of casual pants.

Then came time for baby gear and clothes!

I had so many people shower us with love and gifts and got some great clothes from those baby showers, as well as various gear like a Fisher Price Rock 'n Play, a Diaper Genie, an Ergo carrier, and a Crib. And while I probably had more baby showers than most folks (you have no idea how appreciative I am of that fact!), there is now way that is enough for a baby. I did make a run to a Goodwill and found some practically new (and some ACTUALLY new) baby clothes - 20 pieces for about $20.

But it was the hand-me-downs are a godsend! My sister-in-law lent me BAGS of baby girl clothes from 0-12 months, along with some crib sheets and towels. A high school classmate saw we were having a baby on Facebook and mentioned she had a bassinet she was looking to get rid of, and when we arrived to get it she also had a few clothes and a bouncy seat to give us! My husband's brother had a whole mess of baby bottles (a set of glass and a set of plastic because his son only took the plastic version), and an impeccably clean Pack 'n Play. My brother and sister-in-law are loaning us another Pack 'n Play (so one can be at a grandparent's house). A friend had a baby in July and even though it was a different season, I got about 40 pieces of clothing that were mostly sleepers and body suits.

And with all these hand me downs came the realization that there are a lot of people out there willing to help each other out, but somehow it's having a baby that brings it out in people.

Perhaps we should think about helping each other out regardless of our children's ages, or whether someone is pregnant or not. Imagine if you had a sweater you didn't want anymore, or that didn't fit, and you asked your friends if they wanted it instead of just donating it?

I know donating it is a great cause to support, but maybe look around you to see if someone else could use the help too! Think of it as helping locally, just like we're supposed to "eat locally" these days!

Thursday, January 2, 2014

Prepping for Baby's Arrival: Easy Meals

I've been known to cook a lot, and I always freeze the extra that I make. That has been in overdrive in the last month or so prepping for the arrival of baby. So that, combined with some shelf stable meals has us covered for multiple nights after baby arrives. Some of the frozen meals took a while too cook, but I just set aside I day I knew I'd be home and had it sit on the stove all day while I went about my cleaning or lounging.

My homemade frozen, ready to cook meals include:
  • Chili
  • Turkey Bolognese (admittedly, this one takes the longest, about 4 hours, but it's soooooo good)
  • Tomato Sauce
  • Ham & Bean Soup
  • Turkey Pot Pie (just the filling, the topping can be added when you cook)
  • Turkey Soup
  • Chicken Soup
  • Chicken Fajitas (I left the chicken raw and didn't put any veggies in the bag, just chicken & marinade)
  • Lasagna
  • Portuguese Kale Soup
My freezer trick is that I cool everything, and then load it into gallon size freezer bags. Label them before you fill them! I also stand them up in a big bowl and turn the top over so it doesn't get messy. I try to judge how much 2 people will eat and only pack that much in the bag. I then freeze it flat. That way they stack really easily in the freezer and don't waste much space. To reheat, let them thaw a bit first, then you can break it up and put it in a pan to heat.

I've borrowed a picture from Jamie Cooks It Up to show the freezer bag technique below. Note this is a smaller bag in a cup, and I use gallon bags in a big bowl.


I also have some easy shelf stable (or mostly shelf stable) meals:

That should be at least 20 dinners (some of them are doubled) and I plan to make some turkey cutlets tomorrow to freeze. I'll bread them, fry them, and then freeze them individually. They can be eaten splashed with lemon, or covered in sauce and mozzarella cheese. They're also great as a sandwich! That'll put me over 3 full weeks of dinners!

I've linked to Jamie Cooks It Up, Meal Survivor, Annie's, Amy's and Campbell's.

What's your favorite go-to meal?